Introduction
You can easily customize Word and Excel reports that are produced by CaseComplete. A template document determines the content and format of the report. This guide explains how to customize existing templates to suit your needs, or create your own templates.
The concepts presented in this guide apply to both Word and Excel reports. When there is a difference between the two, it will be noted.
In addition to the many examples contained in this guide, there are example Word templates that demonstrate advanced reporting features in the Examples folder. Access these by double clicking on the Examples folder in the Word report generation dialog.
Template Document Basics
You must create a template document to specify the content and format of your report. The template uses keywords that tell CaseComplete what data to include in the generated report, where it should be located, and how it should be formatted.
Template Files
CaseComplete templates are regular Word and Excel documents, not Office template files (e.g. for Word, the template is a regular .doc or .docx file, not a .dot file). Both Office 2003 format (.doc/.xls files) and 2007 and later format (.docx/.xlsx files) are supported.
Editing a Template
You can open an existing template for editing by clicking on the “Edit Template” button found on the Generate Word (or Excel) Report dialog, or you can simply open the template file as you would for any other Office document.
Creating New Templates
You can create a new template starting with a blank document, however it’s often easier to start with an existing template. You can either open an existing template as above, and do a Save As, or you can make a copy of the document in the file system. The new template will automatically show in the template list the next time you browse to its folder in the Generate Word Report dialog, or you can press the refresh button or F5 to refresh the list while the dialog is displayed.
It is recommended that you keep your custom templates in a folder different from the built-in templates that come with CaseComplete. The Generate Word Report dialog allows you to easily switch between your custom template folders and the built-in templates folder.
If you have a lot of custom reports, you may want to create sub-folders for your custom templates. For example, you might have a folder called MyReports and under there, separate folders organized by element type (e.g. requirements, use cases and actors). Or organized by report type (e.g. lists, groups, detailed). CaseComplete allows easy navigation to and from sub-folders.
If you would like to copy CaseComplete’s built-in templates to a new folder for customization, they are stored in C:\Program Files\Serlio Software\CaseComplete xyz\WordReports, (or ExcelReports) where xyz represents the current release.
Keywords
A keyword specifies what information should be placed at that particular location in the document. All keywords begin with a dollar sign ($), for example
From that point forward, all keywords must begin with two percent signs. This is especially useful if you use dollar signs in your CaseComplete data.
All formatting for a keyword is preserved. For example, if you want the name of the item to be underlined and bold, you would specify $Name.
List Keywords
List keywords identify a list of items to include in your document. See the Item Lists section for details about each kind of list. List keywords begin with one of the following:
- $repeat – contents of the section will be repeated for each item in the list. The section must end with a
$endrepeat keyword. - $list – similar to repeat except that there is only one line per item. Lines can be bulleted, numbered, or unadorned.
- $listAcross – instead of each item taking up one line, the items are added to the same line of a Word document or same row of an Excel sheet.
- $listInCell – (Excel only) – items are listed in the same cell as the keyword, each on its own line.
- $table – (Word only) each row of the table specifies a new item.
- $outline – contents of the section will be repeated for each package in outline order (i.e. as shown in the project browser). Section must end with the
$endoutline keyword. This keyword applies only to packages. - $group – contents of the section will be repeated for groups matching a particular property, e.g. use cases grouped by priority. Section must end with a
$endgroup keyword. - $matrixColumn, $matrixRow – (Excel only) equivalent to
$listAcross , and$list , respectively. In addition, where the rows and columns intersect, a checkmark (or any other text) will be placed when intersecting items are related. - $numberOf – reports the number of items that would be shown for an equivalent $list or $repeat. You may use this with a where clause.
Immediately following the list keyword (e.g.
Example list keywords:
Property Keywords
A property keyword indicates that the value of the corresponding field for the current item should be placed at that location in the document, for example
Showing Parent Values
You may report values for the owning item of any given item. For example, if you are showing values for an issue, you may also want to show the ID of the parent that owns the issue. Do this by using the
Showing Custom Fields
If you have created custom fields, you can show their values by using keywords just as you would for a built-in property. For example if you had a custom field called Minimal Guarantee, you could access the value by using the
Additionally, beginning your custom field names with numerals or containing certain punctuation marks and other special characters – while supported in the tool – will not operate when included as part of a report template.
In addition to referencing a specific custom field, you can show all custom fields defined for a given item by using any list keyword, e.g.
Other Keywords
In addition to list and property keywords, there are other keywords that affect how the report is formatted, and display information about the report itself. These are explained in the Reference section.
Adding Report Information
You can optionally add a description and version to your report template to make it easier for others to know what the report contains. When CaseComplete finds report information, it displays that in the Generate Report form:

To add the optional report template information, edit your report and add a report information block – a section delimited by
    $info
    $description “This report shows details on all priority 1 use cases that are assigned and incomplete.
    Use this report for status reporting and to verify progress on use cases.”
    $version 1.0
    $endinfo
Info section settings
Use the
Use the
For Word reports: It is fine if quoted text wraps, but do not insert a carriage return inside the quotes.
For Excel reports: any of the report information can be in the first six columns of the report, but it must be on the first worksheet in the workbook.
Info section comments
You can add comments to the report template’s
    $info

    // don’t use this yet – needs PMO approval

    $description “This report shows details on all priority 1 use cases”
    $version “unapproved”
    $endinfo
Add multi-line comments in between “/*” and “*/”:
    $info
    /*
        Author: Rubius Hagrid
        Date:    20 March 2011
        Client: Flourish & Blots
        Purpose: client required a daily report of use cases started but
        not completed
    */
    $description “Daily use cases in progress report”
    $endinfo
The report information section can also be used to define parameters to pass into the CaseComplete report generator. See Report Variables and Report Parameters for more information.
Sorting
All lists can optionally be sorted by appending
Item Lists
Where your list keywords are placed is very important because it affects what items are included in the list. This is their context, or what section the list appears in. Lists are either at the top level outside of any other list, or contained within other lists. There are two rules to remember:
- If the list keyword is at the top level, then all items used to create your report for the list type get displayed.
- If the keyword is within the context of another item, then only those items that apply to the parent item get displayed, with the exception of the “All” keywords described below.
Before generating your report, you need to decide what gets included. In large part, the reporting template itself will determine what content is embodied in the finished report, but you need to choose what could possibly go into the template. This is the top-level context for your report template.
In general, the top level list keyword used in the report template determines what the valid input for the report is. For example, a report template with
Consider also the placement of
The same rules apply to all item kinds; valid contexts for each item are documented in the Reference section.
$repeat
The contents between the
This example will fill in the ID (which will be bold typeface) and name for each use case, sorted by name:
    $repeatUseCasesSortName
    ID of Use Case: $ID
    Name of Use Case: $Name

    $endrepeatUseCases
Note that the section includes a blank line after the Use Case name, so there will be 3 lines repeated for each use case: the ID, the Name and a blank line. That empty line could just as easily be a Word page break, which would put each use case on its own page, or the
$repeatAll
By default,
$list
Use the list keyword if you want to specify a list of items where each item is specified on one line. Each line can optionally be bulleted or numbered. The
This example will list the name and ID of each use case, sorted by ID in a bulleted list. The IDs will appear in parentheses. For Excel, all three keywords can occupy the same cell, or each keyword can be in its own cell, depending on how you want your data formatted.
This example will list issues in a numbered list. Even though no property is specified, the text of the issue will be displayed:
A useful feature is to use the columns capability of Microsoft Word to create multi-columned lists. (These appear as “Section Break (Continuous)” when viewing the document in normal view.)
$listAll
By default,
$listAcross
Like the
To use the
    $repeatUseCasesSortID
    Actors for $ID $Name: $listAcrossActors $ID $Name,
    $endrepeatUseCases
In this example, the ID and Name of the primary and supporting actors for each use case will be reported. Each actor will be separated by a comma and space. CaseComplete will not include a trailing comma and space after the final actor.
You may include a
To use
$listInCell (Excel Only)
Like the list keyword above, except instead of each item being listed in its own row, the items will be listed in the same cell as the
Unlike
$table (Word Only)
Use the
This example lists the ID, name and description for actors, sorted by ID:

Note that the first column specifies 2 keywords separated by a space:
Recall that all formatting is preserved when CaseComplete exports to Word. This allows you to set appropriate column widths, set font characteristics of the column contents and modify the table style, for example by using “Table AutoFormat…” in Word.
Empty
tables will automatically be removed. In the example above, the table will be removed from the report if there are no actors in the project. In addition, if there is a blank line following the table, it will also be removed when the table is empty. This prevents accumulation of blank lines when there are consecutive empty tables. In some cases you may not want the blank line to be removed. In this case you can use the
Combining Lists and Tables (Word only)
It is legal to include a

Including a
$outline
Use the
    $outlinePackages
    1. Package: $Name
        $repeatUseCasesSortName
        $Name
        $Description

        $endRepeatUseCases

    $endoutlinePackages
Note the auto numbering in front of the package name. This is required for proper functioning of the report, and
$group
Use the
For example, if you group use cases by priority, all priority 1’s will be shown, followed by all priority 2’s, etc.
You specify the grouping property by appending
In the following example, use cases are grouped by priority. At the start of each group there is an underlined header showing the priority of the use cases in the group. The use cases within each group are shown via a
    $groupUseCasesByPriority
    Priority: $Priority
    $repeatCurrentGroupSortID
    $ID $Name
        • $listIssues
    $endrepeatCurrentGroup

    $endgroupUseCases
Groups within Groups
Nested groups are legal. In this next example, there are 2 levels of nesting. Use cases are grouped first by release, and then within each of those groups, they are grouped by priority:
    $groupUseCasesByRelease
    Release: $Release
    $groupCurrentGroupByPriority
        Priority: $Priority
        $listCurrentGroupSortID $ID $Name
    $endgroupCurrentGroup

    $endgroupUseCases
Note that each
Group by Package
To organize your items by their owning Packages, there are two techniques. First, you can use one of the repeat keywords, such as
    $repeatPackages
    Package: $Name
    $listRequirements $ID $Name
    $Break
    $endrepeatPackages
Note that when you use this approach, the package will be shown even if it doesn’t contain any requirements. If you prefer not to include those packages, you can add the where Requirements exist clause after the repeat (see explanation of the where clause in Where Clause section below).
Alternatively, you can use the
    $groupRequirementsByPackage
    Package: $Package
    $listCurrentGroupSortID $ID $Name
    $Break
    $endgroupRequirements
$groupAll
By default,
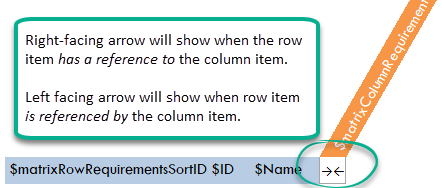
$matrixColumn and $matrixRow (Excel only)
Use these keywords when you want to show a matrix of related items. The
The matrixRow and matrixColumn keywords function like other list keywords. You must specify contents, e.g. UseCases or Requirements, any number of property keywords e.g.
The cell at the intersection of the
You may use two different characters, e.g. arrows facing different directions, to give a visual indication of the direction of the relationship. Or you may use the same character, e.g. two checkmarks, when you don't care about the direction, but still want to report references in both directions.
This example template will show references between requirements in both directions:
$numberOf
This keyword displays the number of items of the given kind, e.g.
Just as for any list keyword, the context is important. For example, when used at the top level, it reports the number of items in the entire scope of the report. When used within a $repeatPackages or $repeatUseCases section, it reports the number of items of the given kind owned by the current package or use case.
Diagrams
You can report on diagrams just as any other list items. Diagrams work with any list keyword such as
To insert an image of the diagram, use the
To insert an automatically generated activity diagram, use the
To insert information for a specific diagram, use the
    $beginDiagram MyDiagram.ndx
    $Description $DeleteEmptyLine
        $Picture
    $Name
    $listIssues

    $endDiagram
Referenced Diagrams within Steps and Extensions
Referenced diagrams found within the text of a use case step or extension can be displayed underneath the text of the step. (A diagram reference is created by right clicking in a step or extension and selecting Insert Diagram Reference.) To display the referenced diagrams, use the
    $repeatSteps
    $indent $OutlineNumber $Description
    $repeatDiagrams

    $indent $FileName:
    $indent $Picture

    $endrepeatDiagrams
    $endrepeatSteps
The use of
Referenced Diagrams within Test Steps
To show referenced diagrams found within the text of testing procedures and expected results for a step, use
Splitting Large Diagrams
Large diagrams will automatically shrink to fit the page up to a threshold size at which point they will be split and shown on multiple pages. The diagram will be split in one direction only. For example, if the diagram is taller than it is wide, it will be be split into two or more vertical sections. If both dimensions are larger than would fit on a page, the direction chosen to split is the one that would require the most scaling. Square or nearly square diagrams will not be split since both directions must be scaled to fit the page so there would be no benefit to split among multiple pages.
The default split point is 1400 pixels for vertical, and 1200 pixels for horizontal. Diagrams won't be split until at least one of its dimensions is larger than the corresponding split point. You can control that point with the
    $DiagramSplitH 1500
    $DiagramSplitW fit
Where Clause
The where clause allows you to filter the contents of your lists in a wide variety of ways. For example, you may want to include only a specific kind of requirement in your table, or report only use cases that are assigned to a specific person.
See the Examples folder that comes with CaseComplete for several report templates that demonstrate the use of the where clause.
Syntax
The where clause appears after any valid list keyword, i.e. table, list, group, repeat and outline. The general form for the clause is:
(The square brackets indicate optional items – don’t use them in the clause.)
The meaning of each item in the clause:
- where: required keyword
- not: optional keyword that uses the inverse set of items
- property: what property to filter on; may be a custom field
-
operator: comparison operators such as
=, <,>, <>, etc. (see below) - value: the value to compare the property to; single quotes optional
- and: both sections of the where clause must be true
- or: either section of the where clause can be true
Examples:
$listUseCases where AssignedTo = Lucy $listUseCases where not AssignedTo = Lucy $listUseCases where AssignedTo <> Lucy (alternative to previous) $repeatRequirements where Priority > 3 $tableRequirements where Type = Business Rule $listNotes where DateAdded > 1/1/2006 $listRequirements where Status != Deferred and Status != Rejected $numberOfUseCases where UseCaseStatus = Name Only and Release = 2.0 $listUseCases where AssignedTo = Lucy and (Priority = 1 or Issues Exist) $listIssues where not Description StartsWith ‘Resolved:’ $listIssues where AssignedTo = ‘’ (see explanation below)
The last example is useful when you want to search for properties that are empty, i.e. they haven’t been assigned a value yet. The search string in this case is two single quotes with no space in between. Alternatively, instead of two single quotes you can use the predefined variable,
Rarely you may run into a situation where the end of the where clause is ambiguous. By definition, the clause ends at the end of the line (as in the case for
Valid operators
As mentioned above, there must be a space before and after operators. The following table lists all valid operators for the where clause. They are not case sensitive.
| Operator | Description |
|---|---|
| = (or ==) | Equal to (either form is acceptable) |
| <> (or !=) | Not equal |
| < | Less than |
| > | Greater than |
| <= | Less than or equal to |
| >= | Greater than or equal to |
| contains | Does the property contain the specified text? (case sensitive) |
| like | Does the property contain the specified text? (case insensitive) |
| startswith | Does the property start with the specified text? (case sensitive) |
| startslike | Does the property start with the specified text? (case insensitive) |
| exist | Does the item own any children of the given type? |
Any number of property-operator-value clauses can be strung together with AND / OR. Order of evaluation of each clause is left to right, however you may use parentheses to affect evaluation order. For example:
is equivalent to:
but you may have meant this instead:
Contains, Like, StartsWith and StartsLike operators
Use the contains, like, startsWith and startsLike operators to search a property for particular text. For example:
The first example lists all actors that have “Manager” somewhere in the name (with the same case).
The second example lists all use cases that include “logged in” somewhere in the text of the preconditions (regardless of case). Note that even though “logged in” is two words, you do not need to surround it with quotes. But you are free to do so if you think it is more readable (they must be single quotes, not double quotes).
The third example lists all requirements whose ID begins with "REQ-A-". This is a case sensitive search.
The final example lists all issues that start with “important:”, regardless of the case of “important”.
Exist operator
Use the exist operator to determine if an item owns specific kinds of items. The where clause structure for the exist operator is slightly different than other operators: instead of a property to compare, it uses one of the list contents keywords and doesn’t use a value. For example:
In this case, only use cases that have issues will be used in the repeat loop. Continuing with this example, the rest of your repeat section might look something like this:
    Issues for: $Name
    $listIssues
    $endRepeatUseCases
By using the where clause, use cases that don’t have any issues would not be included in the report.
The keywords you can use with “exist” are the same ones that you can use with a list keyword. See the Reference section for a list, and what contexts in which they are valid (e.g.
The same rules about context described in Item Lists section above also apply to the exist operator. So for example, if you use “UseCases” in the context of an actor, only actors that have been assigned to at least one use case will be shown:
Or you can use it in the context of a requirement to list all requirements that have been assigned to a use case:
The two examples above are perhaps more useful if you include not in the clause to obtain a list of items that are missing use cases. For example, if you want to show all actors that aren’t assigned to any use cases:
Likewise, to list requirements that have not been assigned to a use case:
Advanced Topics
Reporting References Between Items
Referenced and Referencing Items
CaseComplete allows you to report which items the current item has references to as well as the items that the current item is referenced by. For example, you can report all the requirements that a use case holds references to, or for a requirement, report the use cases that hold a reference to it.
To report referenced items, use ReferencedActors, ReferencedRequirements, ReferencedUseCases, ReferencedStories, ReferencedDefinitions, or ReferencedItems with any list keyword. For example:
Substitute Referencing for Referenced in the keywords above to report on referencing items, i.e. the items that hold a reference to the currrent item. For example:
The ReferencedItems and ReferencingItems variations show references of any type, while the others show only references of the specified type. Tip: when listing ReferencedItems, use the
You can see an example report templates that use these keywords in the Examples folder in CaseComplete’s built-in reports.
Kinds of References
A reference to an item can be by name, by ID, or explicit, depending on its type:
How Items can be Referenced
| Item being referenced | By ID | By Name | Explicit |
|---|---|---|---|
| Actor | ✔ | ✔ | ✔ (in the context of use cases) |
| Use Case | ✔ | ||
| Story | ✔ | ||
| Requirement | ✔ | ✔ (in the context of use cases, requirements, or definitions) | |
| Definition | ✔ |
When reporting references that are by name or by ID, CaseComplete looks in the following fields:
- Description
- All custom fields
- Preconditions, Success Guarantees, Steps, and Extensions of a Use Case
- Acceptance Criteria of a User Story
- The Type field of a Definition’s Fields (references to other definitions only)
References that are located in other fields, including an item’s notes and issues, are ignored.
Context of Reference Keywords
All the keyword variations above can be used in the context of any kind of item. For example, it’s perfectly legal to list ReferencedActors in the context of a user story even though there isn’t an explicit relationship in CaseComplete between those two kinds of items. The reporting engine will report on the actors that are referenced by name or by ID by each story
In addition, the Referenced keyword variations can be used at the top level of a report (i.e. outside any other repeat loop). When you do this, the referenced items are drawn from the items in the scope chosen when generating the report. This is especially useful if you are reporting on a subset of your items, such as a specific package or the currently selected items, because it allows you to show only the items that are relevant to the items being reported on. For example you might want to have a report glossary that only lists the definitions that are referenced by items in the report, leaving out those that aren’t referenced.
Likewise, if a Referenced keyword variation is used within the context of a package, then the referenced items are drawn from all the items in the current package.
Special Cases
The following special cases allow you to refine which references are reported:
- Use
$listActors instead of$listReferencedActors in the context of a use case if you only want primary and supporting actors, excluding references to actors that are by name or ID. - Likewise, use
$listUseCases instead of$listReferencingUseCases in the context of an actor if you only want use cases that use the actor as primary or supporting. - Use IncludedUseCases (described below) instead of ReferencedUseCases to limit references to just those that are in use case steps.
Filtering References
You can use a where clause in conjunction with either ReferencedItems or ReferencingItems to filter out references that you aren’t interested in. The following keywords can be used to query information about a reference:
| Keyword | Valid Values |
|---|---|
| RefLocation | Description, Goal, Primary, Supporting, Preconditions, SuccessGuarantees, Step, Extension, Prose, Field, AcceptanceCriteria, TestingProcedure, ExpectedResults, Child, (Any custom field name) |
| RefType | Explicit, IDLink, ByName |
| InCustomField | True, False |
To report on references found in a specific field, such as the description:
Similarly, to show references for a specific custom field, use the name of the custom field. In this example, only actors referenced in a custom field named Important References will be listed:
In addition to RefLocation, you may also query RefType to determine if the reference is Explicit (i.e. added in the item’s details form), via an IDLink (an ID such as REQ-123 that is found in text), or a reference by name (actors and definitions only):
Finally, you may use InCustomField to determine if the reference is defined in a custom field.
To report the references held by each custom field, use InCustomField in a where clause for a
    $repeatUseCases
    $groupReferencedRequirementsByRefLocation where InCustomField = True
    Requirement references in custom field named $RefLocation:
    $listCurrentGroup $ID $Name

    $endgroupReferencedRequirements
    $endrepeatUseCases
IncludedBy and IncludedUseCases
Use “IncludedBy” as the list contents portion of any valid list keyword to show use cases that include the current use case. Likewise, use “IncludedUseCases” to show use cases that the current use case includes. A use case “includes” another use case if it appears as a reference in the use case’s list of steps or extensions (see the “Move complex flows to their own use case” topic in the “Develop your use cases” section of the Roadmap for more information). As an example, the “Log in” use case might be included by many different use cases. Example usage:
    $repeatUseCases
    $ID $Name
    This use case is included by:
        $listIncludedBy $ID $Name
    This use case includes:
        $listIncludedUseCases $ID $Name
    $endrepeatUseCases
As with other list contents keywords, you can use these in a where clause. For example, you can use “$repeatUseCases where IncludedUseCases Exist” to show only use cases that include other use cases. See Exist Operator for information about the “where exist” feature.
Just as for ReferencedActors and ReferencedRequirements above, the context of the IncludedUseCases keyword is important. When at the top level, it will show included use cases for all use cases in the reporting scope. When within the context of a package, it will show included use cases for all use cases in the package. And when within the context of a use case, it will show included use cases for just that use case. Note that unlike IncludedUseCases, the IncludedBy keyword is valid only in the context of a use case.
You can see an example report that uses these keywords in the Examples folder that comes with CaseComplete.
Including a Table of Contents
You can create a table of contents even if your template doesn’t use a traditional outline form. You will need to indicate what part of each section should be included and at what level. Do this by placing your cursor in the text that should be included in the table of contents, select “Format/Paragraph…” and choose the outline level.
In this example, you would probably choose outline level 1 for the “Use Cases” heading and outline level 2 for “$Name” within the table:
    Use Cases
    $repeatUseCases

    $Description
    $endrepeatUseCases
$Description
$endrepeatUseCases
Once you have identified the outline levels, you can insert a table of contents by selecting “Insert/Reference/Index and Tables…” in Word.
Displaying Related Documents as Pictures
If your template includes related documents for a use case, actor, requirement or package (e.g.
There are two categories of files that CaseComplete can display as pictures: standard picture files, e.g. bmp, jpeg, gif, png, etc., and embeddable files, e.g. Visio, Excel, PowerPoint. Any file from an application that supports Object Linking and Embedding (OLE) can be embedded. You can control what types of files CaseComplete should attempt to embed via the same methods as mentioned above. You can also choose to “link” instead of “embed”, in which case any changes to the related document will automatically be reflected in the generated report. To understand more about the embeddable files feature, see “Insert/Object…” in Word.
Nested $repeats of the Same Type
At times, you may want to nest
And in this example, all packages are displayed, in project browser order:
    $repeatPackages
    $Name
    $Description
    $endrepeatPackages
But if you want your child items formatted differently at each level, you can use nested
    $repeatRequirements where IsTopLevel = True
    $ID $Name
    $Description
    First level of child requirements:
    $repeatChildRequirements1SortID
        $ID $Name
        This child requirement has these children:
        $repeatChildRequirements2SortID
            $ID $Name
        $endrepeatChildRequirements2
    $endrepeatChildRequirements1
    $endrepeatRequirements
Note that the where clause on the initial repeat statement restricts the requirements being reported to top-level requirements only. The top level
You may nest up to 10 levels deep by using numbers 0-9 with your repeat statement.
Conditional Sections - $if and $exclude when
CaseComplete allows you to exclude portions of your report based on conditions you specify. For example, you may choose to exclude the issues section for an item when the item doesn’t own any issues. Similarly, you may want to format your report differently based on the value of a property. For example, if priority of a use case is 1, you may choose to show additional text or the value of a particular custom field. CaseComplete provides two keywords for conditional formatting: “$if” and “$exclude when”.
These keywords use the same syntax as the where clause (see Where Clause section) to specify when a section should be included or excluded. In addition, each
    $repeatUseCases
    $ID $Name

    $exclude when Description = ‘’
    Description of this use case:
    $Description
    $endexclude

    $endrepeatUseCases
There is no difference between “$if” and “$exclude when”, and in fact they are interchangeable (but you must reverse the condition). For example, to use
Both forms are provided as a convenience. Sometimes you may find it easier to specify when a section should be excluded, for example:
Others times you may find it easier to easier to deal with positive logic, e.g.
Since
- $listIssues $Description $if [AssignedTo <> ‘’] Assigned to: $AssignedTo $endif
In this example, the “Assigned to:” text won’t appear if the issue hasn’t been assigned yet. Notice the use of square brackets. These are required to designate the end of the condition when text follows on the same line.
CaseComplete does not support an “else” clause, however you can place two consecutive
    $if [Priority = 1] Priority: 1
    $endif
    $if [Priority <> 1] Priority: $Priority
    $endif
Nested conditionals are allowed but you must use the numbering mechanism described in the previous section for nested repeats so that CaseComplete knows which
Likewise, if you have 2 or more
“When” Clause – Conditional inclusion of document section
There may be times when you want to include a section of your report if certain elements are present in your project, but otherwise you don’t want that section to show. The “when” clause lets you define a section of your document with specific criteria – when that criteria is met, then the section is included.
The “when” keyword works a little differently than the “if” and “exclude” keywords. Rather than testing a condition based on a property keyword, the “when” expression lets you test for the existence of a specific type of element. The essential construction of a “when” clause is:
…
$endwhen<elementkind>
Here’s a simple example to start with that includes a section if requirements are part of the report:
    $whenRequirements
    Non-behavioral Requirements
    Non behavioral requirements describe aspects of the system not directly related to system/user interactions.

    $repeatRequirements
    …
    $endrepeatRequirements

    PLEASE REVIEW THE TEST PLANS FOR EACH REQUIREMENT AFTER YOU HAVE COMMENTED ON THE ABOVE REQUIREMENTS.

    $endwhenRequirements
The “when” clause in the example above conditionally inserts a header section, a list of requirements and a footer section. If the condition in the “when” clause is met, everything in between the
The “when” keyword can also include optional filtering using the where keyword and the filtering criteria (see Where Clause section for details on using the where keyword):
    $whenRequirements where Priority = 1
    Top Priority Requirements must be implemented first
    $repeatRequirements where Priority = 1
    …
    $endrepeatRequirements
    $endwhenRequirements
In this example, the caption text and priority 1 requirements block is only rendered in the report if there are requirements with a priority 1 level.
Showonce – adding a header section to a repeat section
When you have created a report using a
The essential construction of “showonce” is
$showonce
…
$endshowonce
$endrepeat…
The content between the
    $repeatRequirements
    $showonce
    Non-behavioral Requirements
    Non behavioral requirements describe aspects of the system not directly related to system/user interactions.
    $endshowonce
    …
    $endrepeatRequirements
The section caption and description will be rendered in the report once, followed by the body of the requirements section (elided here for brevity).
Report Variables
Report variables are a convenient way to store values from one part of a report and show them in another. If you have ever used variables in any programming language, this will be very familiar. If not, this section should be enough to get you started.
Report variables are essentially buckets where you can store information. That information can be a literal value, a value from project elements like Name or Description, and can even be a value passed from CaseComplete when you generate your report (see Report Parameters below).
Assigning a report variable is easy. The essential construction of assigning a value to a variable is:
Once you have assigned a value to a variable, you can use the variable name in your report. When the report is run, the variable will be replaced with its value. If you are familiar with programming languages, you’ll notice that you don’t need to do anything to declare the variable before you use it.
The example below assigns literal values to variables and then displays them:
    $set $$numbervalue 3.14159
    $set $$wordvalue pi
    $set $$textvalue is approximately

    $$wordvalue $$textvalue $$numbervalue
Running the report produces:
You can use variables to store properties of your project elements when you want to show them in the report later when it’s difficult or inconvenient to include those values. The following example loops through packages, stores the package name and then loops through each use case, displaying the name of the use case with the package name:
    $repeatPackages
    $set $$PackageName $Name
    $Name
    $repeatUseCases
        $$PackageName : $Name
    $endrepeatUseCases
    $endrepeatPackages
Advanced Usage
Variables aren't limited to just one value. You may combine text and any number of properties:
$set $$IDAndName ID and Name: $ID, $Name
You may also add information to an existing variable. In this example, the use case IDs are accumulated in the $$IDsInLoop variable by appending the current ID to the end of the variable each time through the loop:
    $repeatUseCases where Priority = 1
        $ID $Name
        $set $$IDsInLoop $$IDsInLoop $ID
    $endrepeatUseCases
    Here are the IDs of P1 use cases: $$IDsInLoop
One application of this technique is to prevent reporting on items more than once. In this example, since multiple requirements can have the same referencing use cases, it only shows full details of the use case the first time it's encountered, then just the ID and Name after that:
    $set $$AlreadyReported $$Empty
    $repeatRequirements
        $ID $Name
        $repeatReferencingUseCases
        $if [$$AlreadyReported Contains $ID]
            Referenced by $ID $Name (See above for details)
        $endif
        $if [not $$AlreadyReported Contains $ID]
            $Comment use case hasn't been shown yet, show full details
            Referenced by $ID $Name
            Priority: $Priority, Assigned to: $AssignedTo
            $Description

            $Comment add it to the list of IDs that have been already been reported in full
            $set $$AlreadyReported $$AlreadyReported $ID
        $endif
        $endrepeatReferencingUseCases
    $endrepeatRequirements
Note the brackets in the $if statements above are required to allow the use of a property keyword ($ID in this case) in the condition.
$$Empty
    $repeatUseCases where Release <> $$Empty
        $if AssignedTo = $$Empty
            Use case $ID has its Release set but hasn't been assigned to anyone yet.
        $endif
    $endRepeatUseCases
$$Empty is equivalent to using two single quotes with nothing in between, but improves readability of the report template. It is case sensitive.
Another use of $$Empty is to clear out an existing variable. For example:
    ...
    $set $$Message This use case is non-trivial
    $if Complexity = Low
        $set $$Message $$Empty
    $endif
    $$Message
    ...rest of use case...
In the example, if the complexity of the current use case is low, the message will be blank. This example is contrived (you can conditionally show the message without the $$Message variable), but the technique could be suitable when a variable is used in multiple places.
Report Parameters
Report parameters allow you to set the value of a report variable when the report is generated. This can be used, for example, to change report titles or other information “on the fly” without modifying the report template (see Report Variables for more information on report variables).
If report parameters have been declared for a report, you can update the values for those parameters from the Generate Report form:
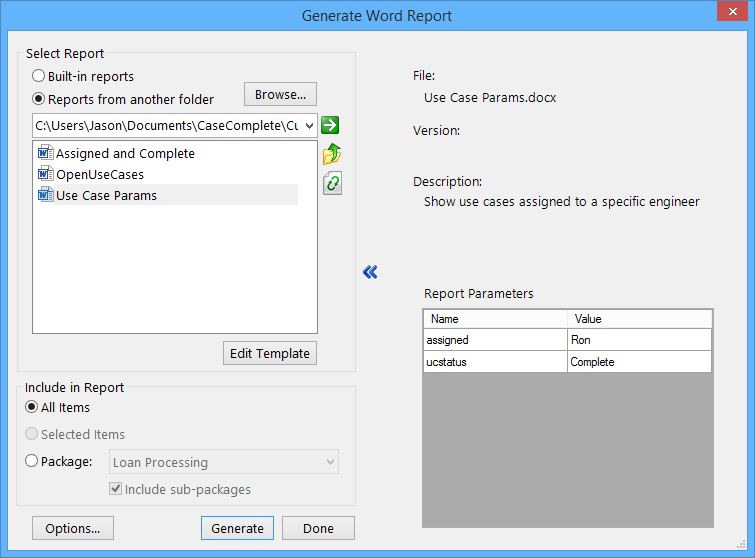
In this custom report, two parameters have been defined to limit the report to use cases assigned to a specific engineer where the use case is in status “Complete.”
Defining Report Parameters
To create a report that takes parameters, start by adding a report information section to the report template (see Adding Report Information for more information on report information sections). for each parameter, declare it with the
    $info
        $param $$assigned
        $param $$ucstatus
        $description “Show use cases assigned to a specific engineer”
    $endinfo
Next, use those parameters as variables in your report (see Report Variables):
    $info
        $param $$assigned
        $param $$ucstatus
        $description “Show use cases assigned to a specific engineer”
    $endinfo

    USE CASES
    $repeatUseCasesSortID where AssignedTo = $$assigned
    and UseCaseStatus = $$ucstatus
    $ID - $Name
    $Description
    $endrepeatUseCases
When you run the report, the Generate Report form will display the parameters. Click on each Value cell and type in a value. When you generate the report, those values will be filled in for the $$assigned and $$ucstatus variables.
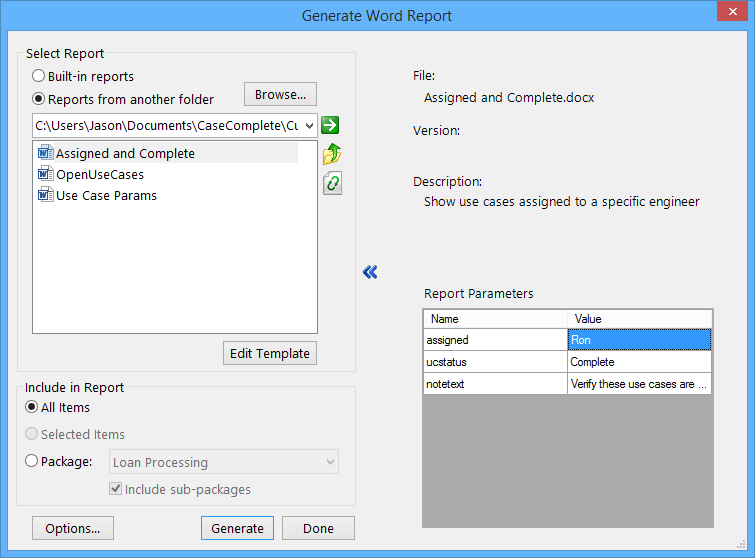
Default Parameter Values
To specify a default value for a parameter, append the value to the declaration in the
$info
$param $$assigned Ron
$param $$ucstatus Complete
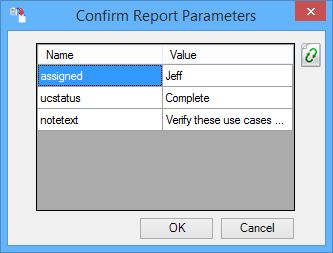
$param $$notetext “Verify these use cases are complete and tested”
$description “Show use cases assigned to a specific engineer”
$endinfo
USE CASES for $$assigned
Note: $$notetext
$repeatUseCasesSortID where AssignedTo = $$assigned and UseCaseStatus = $$ucstatus
$ID - $Name
$Description
$endrepeatUseCases
When you start the Generate Report form, the parameter values will be filled in with your default values. You can accept the defaults or change them prior to generating your report:
Recently Used Parameterized Reports
CaseComplete’s Report tab includes a section that lets you run a recently-run report without launching the Generate Report form:
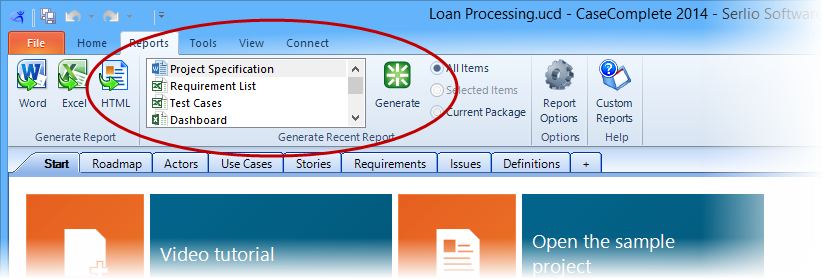
When you run a report from the Recent Report list, CaseComplete will automatically check to see if parameters are declared in that report. If there are parameters declared, CaseComplete will prompt you to confirm or change the parameter values for that report:
Simply change the values if needed, and click “Ok” to begin generating the report.
Generating Reports from a Command Line
CaseComplete supports the ability to generate reports unattended from a command line. This is useful if your CaseComplete project becomes quite large and generating them takes a long time – you can use the Windows task scheduler to execute those reports when you’re not using your computer. Teams may also want to schedule a series of reports to be generated on a scheduled (e.g. daily) basis.
When CaseComplete is running reports from a command line, it runs invisibly in the background – you won’t see the application or a minimized icon. It will start when invoked and shut down automatically when the report is generated.
Command line parameters
Specify the following command line parameters to run unattended report generation:
| Command line flag | Required | Description |
|---|---|---|
| /project | yes | Followed by full path and filename to the CaseComplete project file (*.ucd) |
| /runreport | yes | Followed by full path and filename of report template (.doc[x], .xls[x], .xslt) |
| /savereport | yes |
Followed by full path and filename of file to save the report to
|
| /package | no | Specify the name of the package if you want to limit the report content to one package |
| /includesubpackages | no | If using the /package option, use this to include subpackages of the specified package |
| /excludesubpackages | no | If using the /package option, use this to exclude subpackages of the specified package |
| /filter | no | Specify the name of a filter to limit the report content to filtered items. Filters stored with the project file will be searched first and if not found there, private filters for the current user will be searched. Can be used in conjunction with /package. |
| $$variablename | no | Specify name of variable and value to pass to report generator. Enclose the value of the parameter in quotes. |
casecomplete.exe /project “c:\myprojects\newproject\newproject.ucd” /runreport “c:\mycustomreports\ProjectSpecification.docx” /savereport “z:\specs\published\daily\Completed Use Cases” $$ucstatus “Completed”
casecomplete.exe /project “c:\myprojects\newproject\newproject.ucd” /runreport “c:\mycustomreports\ProjectSpecification.docx” /savereport “z:\specs\published\daily\Completed Use Cases” /package “Accounting” /excludesubpackages
casecomplete.exe /project “c:\myprojects\newproject\newproject.ucd” /runreport “c:\mycustomreports\Requirement List.docx” /savereport “z:\specs\published\daily\Requirements hot list” /filter “High priority requirements”
ErrorLevels
If CaseComplete encounters an error when running a report from the command line, it will raise an ErrorLevel value of 1. If the report completes successfully, it raises ErrorLevel 0. The Windows Task Scheduler will use these values to determine if it completed or not. You can use this when you are scripting scheduled tasks in a batch file:
casecomplete.exe /project “c:\myprojects\newproject\newproject.ucd” /runreport “c:\mycustomreports\ProjectSpecification.docx” /savereport “z:\specs\published\daily\Completed Use Cases” $$ucstatus “Completed”if errorlevel 1 goto handleerror
casecomplete.exe /project “c:\myprojects\newproject\newproject.ucd” /runreport “c:\mycustomreports\ProjectSpecification.docx” /savereport “z:\specs\published\daily\InProgress Use Cases” $$ucstatus “Started”
if errorlevel 1 goto handleerror
goto done
:handleerror
echo “CaseComplete report generation failed”
rem do something meaningful
:done
echo “CaseComplete report generation completed”
Finding error details
In the event that a command line report encounters an error, CaseComplete will add an error event to the Windows event queue. You can check what caused the error from the Windows Event Viewer’s Application log (application name “CaseComplete”).
Reference
List Contents
Append these keywords to any of the list types (
| List Contents Keyword | Valid Contexts |
|---|---|
| AcceptanceCriteria | Top level, story |
| Actors | Top level, package, use case, diagram |
| AnytimeExtensions AnytimeExtensionsNoSteps | Use case |
| ChildRequirements | Requirement (the children of the current requirement) |
| ChildRequirementsAll | Requirement (the children of the current requirement plus their descendants) |
| ChildStories | User story (the children of the current user story) |
| ChildStoriesAll | User story (the children of the current user story plus their descendants) |
| ChildUseCases | Use case (the children of the current use case) |
| ChildUseCasesAll | Use case (the children of the current use case plus their descendants) |
| Constraints | Field |
| CurrentGroup | Must be within a $group section |
| CustomFields | Use case, package, actor, requirement, definition |
| Definitions (or Dictionary*) | Top level, package |
| Diagrams | Top level, package, use case, actor, requirement, step, extension, test scenario |
| ExpectedResultsDiagrams | Test step |
| Extensions, ExtensionsNoSteps | Use case, step |
| Fields | Definition |
| Glossary | Top level (retrieves definitions that don’t have fields defined), package |
| Goals | Top level, actor |
| IncludedBy | Use case |
| IncludedUseCases | Top level, package, use case |
| Issues (or OpenIssues*) | Top level, use case, actor, requirement, diagram, definition, test scenario, package |
| Notes | Top level, use case, actor, requirement, diagram, definition, test scenario, package |
| Packages | Top level, package, diagram |
| PackageIssues | Package (retrieves only the issues directly owned by the package, not issues owned by items in the package, as for the Issues keyword) |
| PrimaryActors | Use case |
| ProcedureDiagrams | Test step |
|
ReferencedActors ReferencedDefinitions (or DomainObjects*) ReferencedItems ReferencedRequirements ReferencedStories ReferencedUseCases |
Top level, package, actor, use case, story, requirement, definition |
|
ReferencingActors ReferencingDefinitions (or ReferencingDomainObjects*) ReferencingItems ReferencingRequirements ReferencingStories ReferencingUseCases |
Actor, use case, story, requirement, definition |
| RelatedDocuments | Top level, use case, requirement, actor, package, diagram |
| Requirements | Top level, package, use case, requirement, diagram |
| RevisionHistory | Package, diagram (shared projects only) |
| Steps | Use case, extension |
| Stories | Top level, package, diagram |
| SupportingActors | Use Case |
|
TestAnyTimeExtensions TestAnytimeExtensionsNoSteps |
Test scenario |
|
TestExtensions TestExtensionsNoSteps |
Test scenario, test step |
| TestScenarios | Top level, use case, requirement |
| TestSteps | Test scenario, test extension |
| UseCases | Top level, package, actor, requirement, definition, diagram |
* deprecated - still supported, but please start using new keyword
Property Keywords
These keywords display values of specific fields for a given item.
Organized by Item Kind
| Item Kind | Applicable Property Keywords |
|---|---|
| All items | $Description, $PlainDescription, $Parent, $Parent<anyvalidproperty>, $Package, $PackageFullPath, $FullPath, $TopLevel<anyvalidproperty>, $TopLevelPackage, $Project, $AppliesTo, $FileName, $FilePath, $TypeName |
| AcceptanceCriteria | None (other than those specified for all items above) |
| Actors | $ID, $Name, $Complexity, $DateAdded, $DateModified, $(AnyCustomField) |
| Constraint | $ConstraintKind, $ConstraintName, $ConstraintText, $ConstraintValue |
| Custom fields | $Name, $Category, $Value |
| Definitions | $Name, $Aliases |
| Diagrams | $Name, $Picture, $DgrmType For shared projects: $LatestAuthor, $LatestCheckin, $LatestComment, $LatestRevision |
| Extensions | $NumberedDescription, $NamedParent, $TestingProcedure, $ExpectedResults, $OutlineNumber, $FullOutlineNumber, $NestLevel |
| Field | $Name, $FieldType, $Description |
| Goals | None (other than those specified for all items above) |
| Issues | $AssignedTo, $Complexity, $DateResolved, $ExternalReference, $Priority, $Resolution, $ResolveBy, $Risk, $Status, $Type |
| Notes | $DateAdded |
| Packages | $Name, $IDPrefix, $NestLevel, $(AnyCustomField) For shared projects: $LatestAuthor, $LatestCheckin, $LatestComment, $LatestRevision |
| Related Documents | $Name |
| Steps | $NumberedDescription, $NamedParent, $TestingProcedure, $ExpectedResults, $OutlineNumber, $FullOutlineNumber, $NestLevel |
| Referenced or Referencing Items | $RefLocation, $RefType, $InCustomField |
| Requirements | $ID, $Name, $Type, $Priority, $AssignedTo, $Source, $Status, $Release, $TestingProcedure, $DateAdded, $DateModified, $OwningRequirement, $OwningRequirementFullPath, $IsTopLevel, $IsNested, $NestLevel, $(AnyCustomField) |
| Revision History | $DateAdded, $Author, $RevisionNumber, $Description (the user's check-in comment) |
| Stories | $ID, $Name, $Priority, $Size, $AssignedTo, $Status, $DateAdded, $DateModified, $IsTopLevel, $IsNested, $NestLevel, $OwningStory, $OwningStoryFullPath, $(AnyCustomField) |
| Test Scenarios | $Name, $Priority, $Description, $Complexity, $Status, $TestingSetup, $TestType, $(AnyCustomField) |
| Test Extensions | $NumberedDescription, $StepDescription, $OutlineNumber, $FullOutlineNumber, $NestLevel, $TestingProcedure, $ExpectedResults, $TestSubjectDescripton, $TestSubjectName, $TestSubjectID, $TestSubjectTestingSetup, $TestSubjectTestingConfigurations, $TestingSetup, $TestName |
| Test Steps | $NumberedDescription, $StepDescription, $OutlineNumber, $FullOutlineNumber, $NestLevel, $TestingProcedure, $ExpectedResults, $TestSubjectDescripton, $TestSubjectName, $TestSubjectID, $TestSubjectTestingSetup, $TestSubjectTestingConfigurations, $TestingSetup, $TestName |
| Use Cases | $ID, $Name, $Priority, $PrimaryActors, $SupportingActors, $PreConditions, $SuccessGuarantees, $Prose, $AssignedTo, $Complexity, $UseCaseStatus, $ImplStatus, $IsTopLevel, $IsNested, $NestLevel, $Level, $Release, $TestingConfigurations, $TestingSetup, $DateAdded, $DateModified, $OwningUseCase, $OwningUseCaseFullPath, $(AnyCustomField) |
| User Stories | See Stories |
Organized Alphabetically
| Property Keyword | Description | Applicable To |
|---|---|---|
| $(AnyCustomField) | Value of your custom field. Specify the name of the custom field without parentheses or spaces, e.g. $MyField | Use Case, Actor, Story, Package, Requirement, Definition, Test Scenario |
| $Aliases | Alternative names or abbreviations | Definition |
| $AppliesTo | The ID of the parent item. If the parent doesn’t use an ID such as packages and diagrams, it will use the name instead. | All items, but most useful for items that can have a parent with or without an ID, such as issues, notes, and diagrams. |
| $AssignedTo | The person or entity responsible for the given item | Use Case, Story, Requirement, Issue |
| $Author | The person who checked in a particular revision of a file | Revision History |
| $Category | User defined category that a custom field belongs to | Custom Field |
| $Complexity | An estimate of complexity for a use case, actor or issue | Use Case, Actor, Test Scenario |
| $ConstraintKind | Identifier for constraint type | Constraint |
| $ConstraintName | Human-friendly name of constraint kind | Constraint |
| $ConstraintText | Human-friendly description of constraint | Constraint |
| $ConstraintValue | Value entered for constraint (e.g. size, valid values) | Constraint |
| $DateAdded | The date an actor, note, requirement or use case was added | Actor, Note, Requirement, Use Case, User Story, Revision History |
| $DateModified | The date an actor, requirement or use case was last modified | Actor, Requirement, Use Case, User Story |
| $DateResolved | Date or other text describing when an issue was resolved | Issue |
| $Description | Textual description of an item | All items |
| $DgrmType | The kind of diagram; possible values are Activity or Generic | Diagram |
| $ExpectedResults | Description of expected behavior during testing | Test Step, Test Extension |
| $ExternalReference | A URL or other identifier linking an issue to an external system | Issue |
| $FieldType | Type name assigned to field | Field |
| $FileName | Name of project file or package file that a given item is stored in | All items |
| $FilePath | Directory path (folder) for the file that a given item is stored in | All items |
| $FullOutlineNumber | The hierarchical number of the step or extension. Same as $OutlineNumber except for steps owned by extensions which include the extension number, e.g. 2.a.1.2 instead of just 1.2. | Step, Extension, Test Step, Test Extension |
| $FullPath | The name hierarchy of the current item, separated by backslashes. If the current item doesn't have a name (e.g. steps or issues), it uses the nearest named parent. The path includes names of owning packages followed by the name of the item (and its parents if nested). See also PackageFullPath. | All items |
| $ID | The ID assigned to an item | Use Case, Story, Actor, Requirement |
| $IDHyperlink | Display the item’s ID as a hyperlink that when clicked on, will start CaseComplete and bring up that item’s details form. (The hyperlink will only work for people who have CaseComplete installed and access to the project file.) | Use Case, Story, Actor, Requirement |
| $IDPrefix | Default ID prefix for new items, e.g. UC-prefix-1 | Package |
| $ImplStatus | The state of a use case’s implementation | Use Case |
| $InCustomField | Used with a where clause to determine if the reference is defined in a custom field. Valid values: True, False. | Referenced Items |
| $IsNested | “True” if the element is a child of another element, “False” otherwise (opposite of $IsTopLevel) | Requirement, use case, user story |
| $IsTopLevel | “True” if the element is owned by a package, “False” otherwise (opposite of $IsNested) | Requirement, use case, user story |
| $LatestAuthor, $LatestCheckin, $LatestComment, $LatestRevision | Details of the last check-in: user, date, user comment, revision number (Shared projects only. Use $listRevisionHistory to get details for ALL check-ins.) | Package, diagram |
| $Level | The level of detail for a use case. Also, the nest level for a step or extension (deprecated, use $NestLevel instead). | Use Case, Step, Extension |
| $Name | User assignable name of an item | Use Case, Actor, Story, Requirement, Package, Diagram, Related Document, Custom field, Definition, Test Scenario |
| $NamedParent | The name of the closest named parent (useful when immediate parent is unnamed, such as a nested step) | Step, Extension |
| $NestLevel | How many levels the item is nested. Top level items are level 0, their immediate children are level 1, and so on. | Requirement, Use Case, Story, Package, Step, Extension, TestStep, TestExtension |
| $NumberedDescription | Step or extension number followed by text of the item. Plain text only. For rich text, use |
Step, Extension, Test Step, Test Extension |
| $OutlineNumber | The hierarchical number of the step or extension. | Step, Extension, Test Step, Test Extension |
| $OwningRequirement | The name of the owning requirement if there is one, blank otherwise | Requirement |
| $OwningRequirementFullPath | The name hierarchy of the owning requirement starting with the top level requirement, separated by backslashes. Blank if it’s a top level requirement. | Requirement |
| $OwningStory | The name of the owning user story if there is one, blank otherwise | User Story |
| $OwningStoryFullPath | The name hierarchy of the owning user story starting with the top level user story, separated by backslashes. Blank if it’s a top level user story. | User Story |
| $OwningUseCase | The name of the owning use case if there is one, blank otherwise | Use Case |
| $OwningUseCaseFullPath | The name hierarchy of the owning use case starting with the top level use case, separated by backslashes. Blank if it’s a top level use case. | Use Case |
| $Package | Name of the Package that the item is a member of | All items |
| $PackageFullPath | The name hierarchy of the owning package starting with the top level package, separated by backslashes. See also FullPath. | All items |
| $Parent | Name of an item’s owner. For steps and extensions, this will be the name of the owning use case (even for nested steps). | All items |
| $Parent(AnyProperty) | Value of the specified property for the item’s parent, e.g. $ParentID. See also TopLevel(AnyProperty) | All items |
| $Picture | Insert an image of a diagram | Diagram |
| $PlainDescription | Description of an item using plain text (no hyperlinks or other rich text formatting). | All items |
| $PreConditions | State of system before a use case starts | Use Case |
| $PrimaryActors | Actors that initiate a use case | Use Case |
| $Priority | Priority rating | Use Case, Story, Requirement, Issue, Test Scenario |
| $Project | Name of the Project that the item is a member of | All items |
| $Prose | Text version of main success scenario | Use Case |
| $RefLocation | Used with a where clause to filter out references that you aren’t interested in. See Filtering References for a list of valid values. | Referenced or referencing items |
| $RefType | Used with a where clause to determine if the reference is Explicit (i.e. added in the details form of the item), via an IDLink, or by name (actors and definitions only). Valid values are: Explicit, IDLink, ByName. | Referenced or referencing items |
| $Release | Applicable software release | Use Case, Requirement |
| $Resolution | Description of how an issue was resolved | Issue |
| $ResolveBy | Date or time frame that an issue should be resolved by | Issue |
| $RevisionNumber | The number assigned by the version control system for a particular revision of a file | Revision History |
| $Risk | Description of risk imposed by an issue | Issue |
| $Size | Size of a user story | Story |
| $Source | Who/what initiated a requirement | Requirement |
| $Status | The current state of an item | Issue, Story, Requirement |
| $StepDescription | Text of the corresponding use case step or extension. Plain text only. For rich text, use |
Test Step, Test Extension |
| $SuccessGuarantees | State of system after a use case successfully completes | Use Case |
| $SupportingActors | Actors that provide a service | Use Case |
| $TestingConfigurations | Description of hardware or software configurations that a use case should be tested with | Use Case |
| $TestingProcedure | Description of procedures used to test an item | Test Step, Test Extension |
| $TestingSetup | The setup required prior to testing a use case | Use Case, Test Scenario, Test Step, Test Extension |
| $TestName | Name of the test scenario | Test Step, Test Extension |
| $TestSubject(Property) | Property can be: Description, Name, ID, TestingSetup, or TestingConfigurations. Retrieves the property of the use case or requirement that owns the test scenario. | Test Step, Test Extension |
| $TestType | The kind of test scenario | Test Scenario |
| $TopLevel(AnyProperty) | Value of the specified property for a nested item’s top-most parent, e.g. $TopLevelID for a child requirement reports the ID of its top-most parent, regardless of how deeply nested it is. If the item isn't nested it reports the value for the item itself. See also Parent(AnyProperty). | All items |
| $TopLevelPackage | Name of the top level Package (the package owned directly by the project) that the item is a member of. If it's a member of the project level package, this will be empty. | All items |
| $Type | Kind of requirement or issue | Issue, Requirement |
| $TypeName | Kind of item being reported. Especially useful as $ParentTypeName, e.g. when reporting items that can be owned by different kinds of parents like notes and diagrams | All items |
| $UseCaseStatus | The use case’s level of completion | Use Case |
| $Value | User assigned value of a custom field | Custom Field |
Other Keywords
These keywords affect report formatting, and display miscellaneous information.
| Keyword | Description |
|---|---|
| $Break | Inserts a break between items in a repeat section (but not after the last item) or between groups. The type of break (blank lines or a page break) is specified in the report options dialog. |
| $BlankLine (Word only) | Indicates there should be a blank line after a $table, even when the table is removed because it is empty (normally, blank lines after empty tables are also removed). |
| $BlankPropertyValue | Defines the text to display when a property is empty. For example, to show “(not set)” for all properties that don’t have values yet, add this line: |
| $Comment | Useful for report authors to include information about the report itself such as reminders and explanations. The paragraph or row that this keyword is in will be removed when the report is generated. |
| $CommentCell (Excel only) | Like $Comment above, except that the cell is cleared instead of the row being deleted when the report is generated. |
| $Count | Displays the number of the current item within a repeat, list or group. |
| $DeleteEmptyLine | Deletes empty lines that remain due to empty fields. For example: If the description is empty, the blank line will be removed. |
| $DiagramSplitW, $DiagramSplitH | Set the point at which diagrams will be split in order to fit on a page in the given direction. Up until that point, the diagram will be shrunk to fit. The keyword must be followed be a number representing the size in pixels, or by "fit" (no quotes) to indicate it should always be shrunk to fit on the page (i.e. never split). (See Diagram Splitting) |
| $EmbedWordDocuments True, False, or Default | Instructs whether Word documents that are reported in RelatedDocuments sections should have their contents inserted, a link generated, or use the default setting from the Report Options dialog. Example: This instructs CaseComplete to embed contents of Word documents into the generated report if any appear in the RelatedDocuments list (instead of showing a hyperlink to the file). Subsequent RelatedDocuments sections will use whatever is specified in the Report Options dialog. |
| $exclude when /$endexclude | Exclude the section between $exclude and $endexclude when the condition is true. $exclude must be paired with “when”. |
| $FilterName, $FilterDescription | Shows the name and the description of the filter used to generate the report, if any. |
| $if/$endif | Only include the section between $if and $endif when the condition is true. |
| $indent | When used within a $repeat or $list of nestable items (steps, requirements, etc.), indents the current paragraph based on the nest level of the current item (e.g. step 1, would have no indent applied, step 1.1 would indent once, etc.) To avoid a trailing space, you can use consecutive keywords without a space in between, e.g. |
| $InstantDiagram | Display an automatically generated activity diagram. Only valid in the context of a use case. |
| $KeywordPrefix | The character or characters following this keyword will be used to designate the start of a keyword (instead of $). |
| $TemplatePath, $TemplateName | Displays the full path and file name, respectively, of the Word template that the report was generated from. |
| $Today, $Now | Displays the date ($Today), or the date and time ($Now) that the report was generated. Unlike Word and Excel dates, these values will not update when the document is opened at a later date. |
| $UsePlainText, $UseRichText | Instructs whether output for subsequent properties should use plain or rich text (e.g. font formatting such as bolding). By default, rich text is used. The line that this keyword appears on will be removed from the final report. |
Copyright © Serlio Software